Hanging ...... Headboards, Skirted Tables & Mirrors
Oh my goodness....I can't believe it's been so long since I posted on the Blog. I've been so busy, but haven't taken the time to write anything down !!!
This one is going to be all over the place so get ready to follow me down a rabbit trail....
To start with, I changed out my headboard and got a new bed - (that's gonna be another OutOnThaPorch topic) and when I took it down I was quickly reminded of how extremely heavy this headboard is AND not everybody knows how to hang one. Or anything else that heavy for that matter.
You can see in this article from the October Issue of Cottage Journal Magazine this headboard is huge !!! It was 80" wide and 60" tall. I bet it weighed 75 or 100 lbs by the time it was covered.


If that wasn't good enough, I decided I was going to get tired of this fabric easily so I made the same skirt out of an entirely different fabric and pillow cased the top so that it could be reversible. I made a contrast piping and turned those pieces.....


This one is going to be all over the place so get ready to follow me down a rabbit trail....
To start with, I changed out my headboard and got a new bed - (that's gonna be another OutOnThaPorch topic) and when I took it down I was quickly reminded of how extremely heavy this headboard is AND not everybody knows how to hang one. Or anything else that heavy for that matter.
You can see in this article from the October Issue of Cottage Journal Magazine this headboard is huge !!! It was 80" wide and 60" tall. I bet it weighed 75 or 100 lbs by the time it was covered.

Most of the time these headboards have legs on the two ends and sometimes in the middle to raise them off the floor as shown in this photo.

But that's not how we do it. Because the legs are never stable enough and the headboard ends up flopping back and forth or the legs can dig a groove into the hardwood floors, etc. We make a French Clete from a 1 x 4 piece of lumber that has been ripped on a 45 degree angle. You can hear all about it on the OutOnThaPorch video.

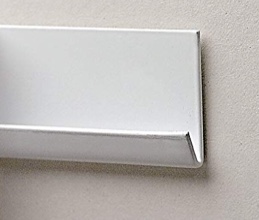
But if you don't have access to a table saw, I've got just the solution - these closet shelving headrails by Rubbermaid. You can get them from Home Depot. Lowe's doesn't always carry this style.

I always purchase 2 of these. One to install on the wall (with a level of course) and one to install on the Headboard.
While OutOnThaPorch one day, I started thinking about the space under our TV. I never liked what I had there.
Of course I wanted something with fabric, and I knew didn't want something as big as the skirted buffet table I did here.....

And I knew I could pretty much make it any size ...... so I went to Pinterest for inspiration to work out the details.
Most of the ones you see are not. They are rectangle like this one from Elements of Style's post....

And this one from Decorpad's post ....

My favorite was from a gal I stalk quite frequently - Carol Raley from Carol Raley Interiors. Check out her Pinterest boards - she's done some really awesome work. I'm not sure how Carol did hers underneath but I knew I was going to make mine as a shelf and hang it on the wall with a French Clete.

I'm pretty sure the top of her board is curved - which is what caught my eye - so I got to work drawing out my top using brown craft paper.

If you are going to put anything heavy on it, you will need to attach some sort of leg down the sides.
My favorite demo buddy Dannyboy made this one out of scrap lumber and to be honest, it is a little overkill. It didn't have to be angled like this. Just a 1 x 6 would have been sufficient but I wasn't going to complain. I just appreciate him doing it for me.


Next I mounted one side of the clete (or in this case the shelf headrail) so that the lip is facing down.
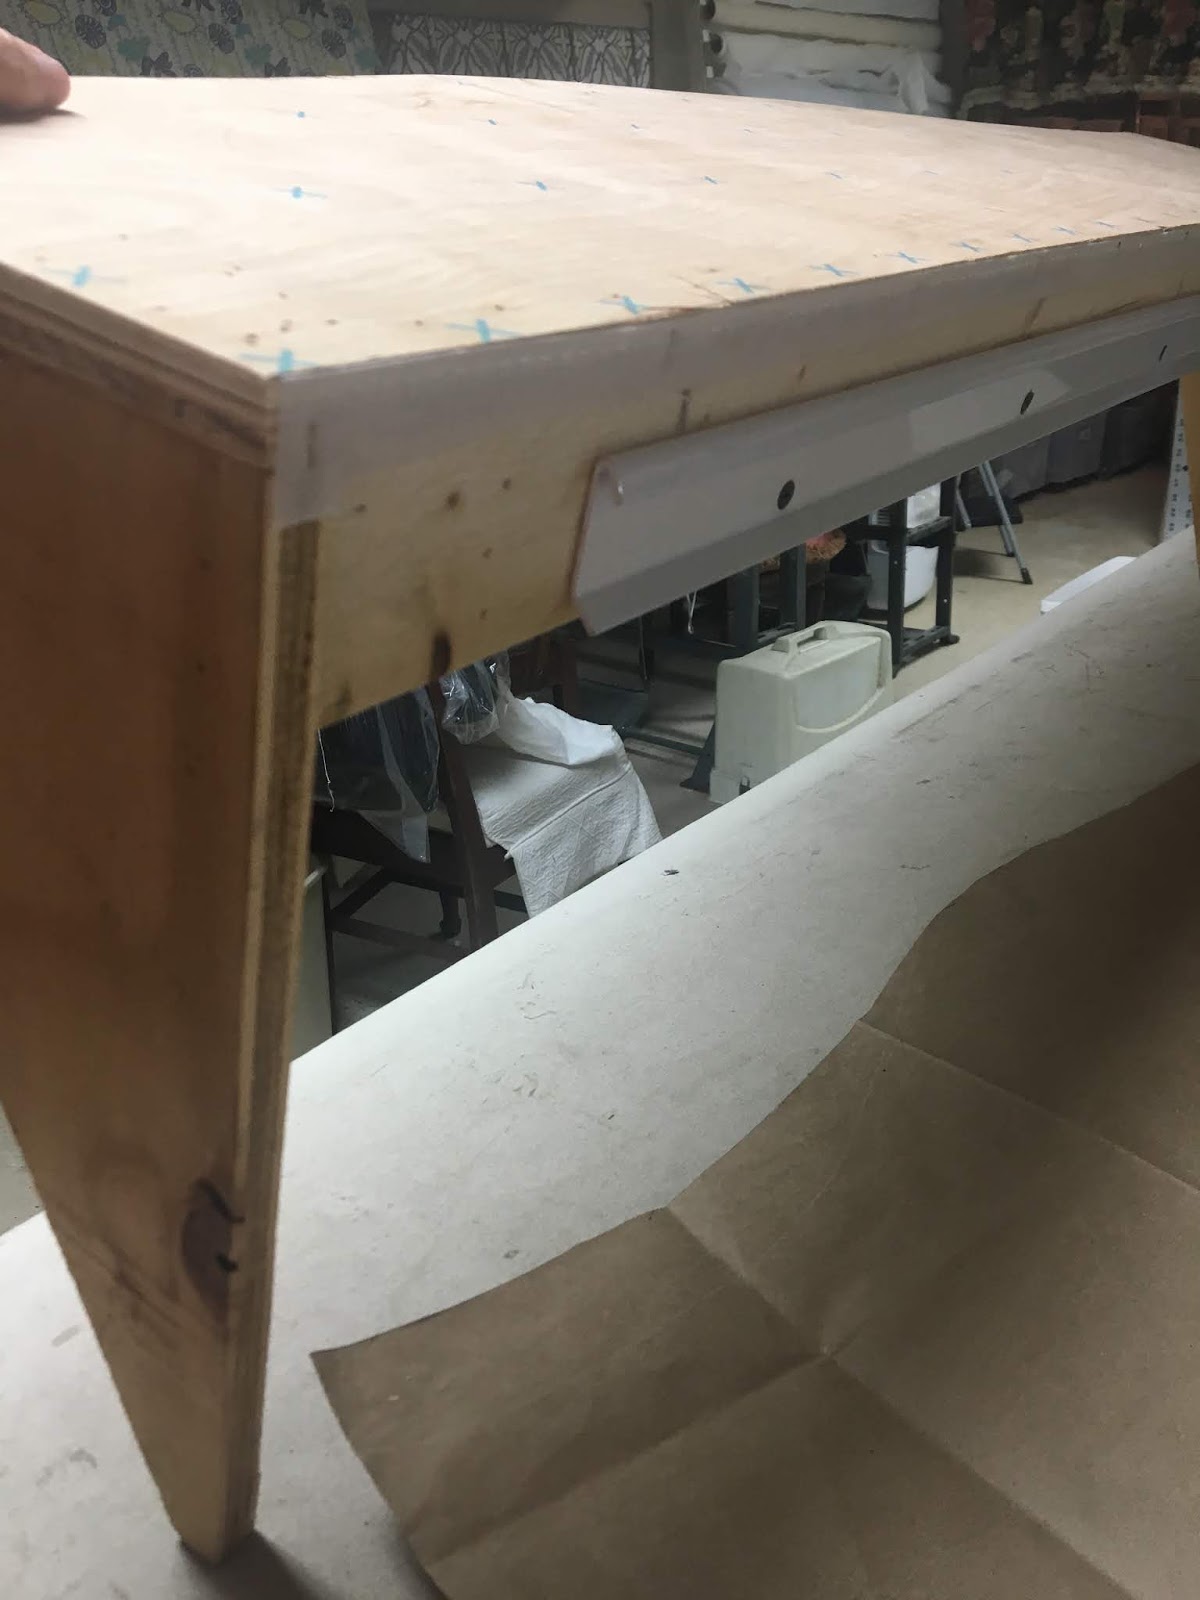
Next I mounted the wall side of the clete or the shelf headrail so that the lip is up.

Then I hung the shelf onto the wall clete and got the accurate measurements from the top of the shelf to the floor to determine how long I wanted it to be.
I wanted to do the skirt in sections so I used the Lace Up Valance pattern as a template. I used all the pattern pieces as if I were making a curtain and just lengthened them A LOT. Using the same brown craft paper you can create a new pattern without messing up you original pattern piece.
I altered the A piece wider so that I would have - one wider center piece in the center, then I altered it again so that I would have 2 side pieces. Next I altered the the 2 return pieces so that they would accommodate the side piece and return back to the wall properly.
I didn't alter the gusset or the B pieces in width for the insets - only in length. We like a gusset instead of doing a folded pleat because it helps to keep the skirt from flailing out at the bottom if you do them in separate pieces. When your fabric has any thickness it won't always stay folded or pleated at the bottom. See how nicely this kick pleat hangs.

When I had all the sizes of the pieces worked out I cut them out of the fabric. When you are working with a pattern design, you always want to match your design so that it is continuous, if possible. Allowing at least 2" seam allowance helps when you are trying to make the design be continuous. You can always cut your fabric down but you can't make it bigger.

See how the design from the center flap is continuous onto the top.
And how it is continuous under the bias banding from one piece to the other.....

You won't get this unless you really plan ahead before making your first cut.
I cut the top piece of fabric first then cut each of the center and side pieces one at a time - and added a 2" seam allowance instead of the normal 1/2" because of the pattern design on the fabric.
After my pieces were all planned and cut and I was ready to construct them together, instead of sewing the front and back pieces right sides together, then turning them like the pattern. Below are 3 of my favorite tools, I used the bias tape maker to make bias contrast banding and applied that around the raw edges using the SteamASeam2 for the floral pieces.......


I added hook and loop to the back side of the shelf

and to a flap at the back of the top so it could be removed and turned around easily.


And wallah !!!! REVERSIBLE Skirted Console Table. I'll add pics of the other side when I decide how to style it !

To see the OutOnThaPorch YouTube Video on this project, click HERE !!!
Just another project I dreamed up while in my favorite place ........

OutOnThaPorch!!!!
Comments